The Callisto Protocol is the latest survival horror game from Striking Distance Studios that takes place in the PUBG universe. As prisoner Jacob Lee, you must escape the infamous Black Iron Prison and uncover its dark secrets.
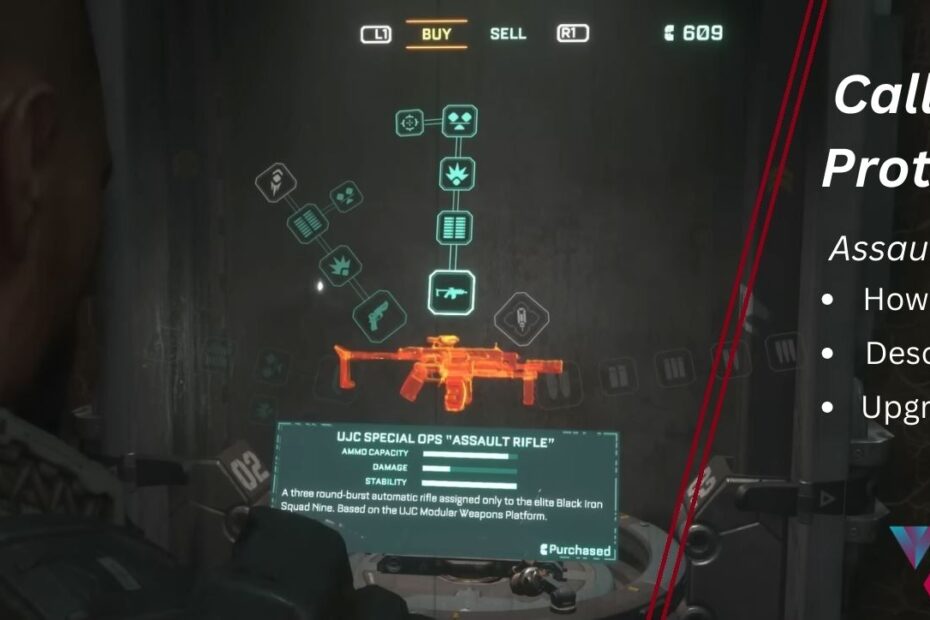
To survive the horrors within, you‘ll need to make use of every weapon at your disposal. One of the most powerful guns you can acquire is the UJC Special Ops assault rifle. However, getting your hands on this devastating firearm takes a bit of work.
In this comprehensive guide, I‘ll walk you through everything you need to know about unlocking the assault rifle schematic, upgrading the UJC to its full devastating potential, and dominating enemies with specialized tactics.
The Raw Power of the UJC Assault Rifle
I‘ve played through The Callisto Protocol three times now, trying out all the different weapon options in the process. Trust me when I say the UJC assault rifle packs the biggest punch once fully upgraded.
The rifle is essentially an advanced combat platform specialized for mid to long range firefights. Here are some key base stats:
| Stat | Value |
|---|---|
| Damage Per Shot | 8 |
| Rate of Fire | 600 RPM |
| Range | 50+ meters |
| Ammo Type | 5.56mm |
| Magazine Size | 25 rounds |
While the damage output per trigger pull trails the shotgun and Magnums at first, the UJC‘s precision and rate of fire make up for it.
Few other starting weapons in Callisto handle as smoothly either when aiming down sights. The GRP Pistol for example suffers from noticeable view kick per shot that throws off subsequent aim. The UJC delivers bursts with minimal reticle disruption by comparison.
That precision lends itself perfectly to scoring critical headshots from a distance. And upgrading the rifle only amplifies its strengths further:
- 33% larger magazine to fire longer before reloading
- 20% damage boost per round from magnum ammo
- 45% increased stability through stock and barrel enhancements
- Homing rounds adding slight auto aim properties
Fully upgrading the UJC costs a hefty 15,000 Callisto Credits. But the resulting amplified rifle arguably rivals the power of late game plasma energy weapons. Those who invest the time to acquire the schematic blueprint and gather upgrade materials will reap the rewards.
Finding the Assault Rifle Schematic
The UJC doesn‘t randomly appear as loot anywhere. To obtain it, players must first retrieve the assault rifle schematic item itself. Based on collecting all documents and audio logs, I‘ve pieced together the context behind this.
The abandoned general store where the schematic is found was once a safe staging point for Black Iron personnel. My working theory is that an undercover operative hid the UJC rifle blueprint there in case fellow agents needed to suit up.
As evidenced by the site now being overrun, things clearly went sideways. But fortunately the critical schematic survived the chaos!
Here are the specific directions on locating the hidden blueprint:
- Reach Chapter 7: The Colony main storyline quest
- Descend into The Slums region to acquire a keycard
- Clear out or avoid the infected while traversing twisting corridors
- Climb the illuminated emergency access ladder to the rooftops
- Locate the exterior of Davida’s Goods store and enter inside
- Exit out the back and spot the posted security signage on the left
- Approach the flickering lights indicating a bathroom entrance
- Search inside to discover the assault rifle schematic
With the schematic finally acquired, you can now print the formidable assault rifle at the next available Reforge station!
Printing and Preparing the UJC Rifle
Thanks to the futuristic reforging technology ports, actually obtaining the assault rifle itself after finding the schematic is straightforward:
- Approach any station interface and select the print option
- Choose the UJC assault rifle listing under ballistic weapons
- Confirm the print job for the cost of 1500 Callisto credits
- Indulge in the detailed weapon assembly animation sequence
- Open your inventory to equip the freshly printed rifle!
With the assault rifle now in hand, it’s time to consider preparation measures before jumping into combat:
- Stock up on reserve 5.56mm ammo when possible
- Unlock weapon holster and balancing rig upgrades to increase carrying capacity
- Collect Greenlion implants to steadily improve health and stability
- Gather Zealots bones to trade for credits needed for rifle upgrades
Now for the exciting part – enhancing the UJC into an absolute monster of a gun. But choosing what upgrade path to follow first can be daunting…
Unlocking the Rifle‘s Devastating Potential
The default UJC packs a punch, but upgrading it unlocks the weapon’s true devastating potential. Players have four distinct enhancement options to pursue:
| Upgrade | Cost | Benefit |
|---|---|---|
| High Capacity Mag | 500 creds | +7 extra rounds per magazine |
| Magnum Rounds | 1500 creds | +20% damage per bullet |
| Stability System | 4500 creds | -45% recoil for improved handling |
| Homing Rounds | 4500 creds | Shots dynamically track targets |
I personally recommend saving up credits to immediately unlock the stability and high capacity magazine upgrades first. This amplifies damage output per magazine while keeping spray accuracy high.
The homing and magnum rounds definitely provide noticeable bonuses against tough late game enemies. But without the handling and sustainability from larger magazines and recoil reduction, unleashing the rifle’s full power is trickier.
Prioritizing stability and ammo capacity transforms the UJC into a hard hitting laser beam. One that shreds through infected flesh and armor plating alike!
Specialized Tactics for Dominating Enemies
When wielding a fully upgraded UJC assault rifle, very few enemies pose much of a threat anymore even on Supernova.
The four rounds per second rate of fire empties the 32 round magazines rapidly. But the sheer projectile count and homing properties mean most enemies fall quickly. Even lumbering Evac Leader mini-bosses drop fast by targeting their bright orange weak points.
Here are some specialized tactics I’ve refined for properly dominating foes with the ultimate UJC:
- Fire in controlled 4-5 round bursts for ammo conservation and heat management
- Target weak point locations like heads and plasma canisters to demolish tougher enemies
- Mix in swift bash and Cleave melee attacks if foes close distance
- Keep strafing constantly to avoid being surrounded
- Use alt fire mode‘s concentrated precision 6 round bursts when needed
- Finish off tougher stunned enemies with Execution attacks when possible
The stability upgrades grant pinpoint precision even spraying full auto across rooms. But avoid wasting ammo unnecessarily to avoid jamming the barrel from overheating.
Time reloads during lulls in action by using cover. Bash then blast any hostiles that get too close rather than backpedaling. Maintaining mobility is critical to preventing enemies like Infectors from rushing your position.
After multiple playthroughs and combat encounters, I‘m positive no other base weapon surpasses a fully upgraded UJC‘s sheer stopping power. Even the final boss fight becomes almost trivial.
So if looking to ease the incredible challenge on higher difficulties, take the time to secure the schematic and upgrade this beast of a rifle!
Unleashing Devastation with the Ultimate Rifle
The Callisto Protocol throws waves of deadly enemies with custom attack patterns to continuously keep players off balance. Having access to a trusty high-powered assault rifle proves essential to dominating those challenges.
Very few weapons match the UJC‘s well rounded capabilities – even without upgrades. It inflicts solid burst damage at most ranges while retaining reasonable ammo capacity. Expanding magazines while enhancing stability and damage then amplifies its strengths even further.
Fully upgrading the rifle requires finding rare crafting components and saving credits for expensive upgrades. But that investment pays off by transforming the UJC into an absolute crutch weapon for tackling the campaign’s most intense chapters.
The additional preparation tips and specialized handling tactics shared here further maximize the devastation this phenomenal rifle brings. No enemy lasts long when caught in the assault rifle‘s enhanced homing hailstorm!
I hope this comprehensive UJC assault rifle guide proves valuable towards upping your survival odds in The Callisto Protocol. Let me know in the comments if the tips for locating the schematic then upgrading the rifle assisted your bloody escape from Black Iron Prison!