Hogwarts Legacy takes players on an immersive journey through the wizarding world, filled with magic, mysteries, and puzzles to solve. One of the more intriguing puzzles players will encounter are the cryptic symbol doors scattered throughout the halls of Hogwarts. At first glance, these doors appear impenetrable with strange markings and dials. However, solving them rewards players with rare magical items and clothing.
In this guide, we will break down everything you need to know to unlock all 12 symbol door puzzles in Hogwarts Legacy.
How Do The Symbol Doors Work?
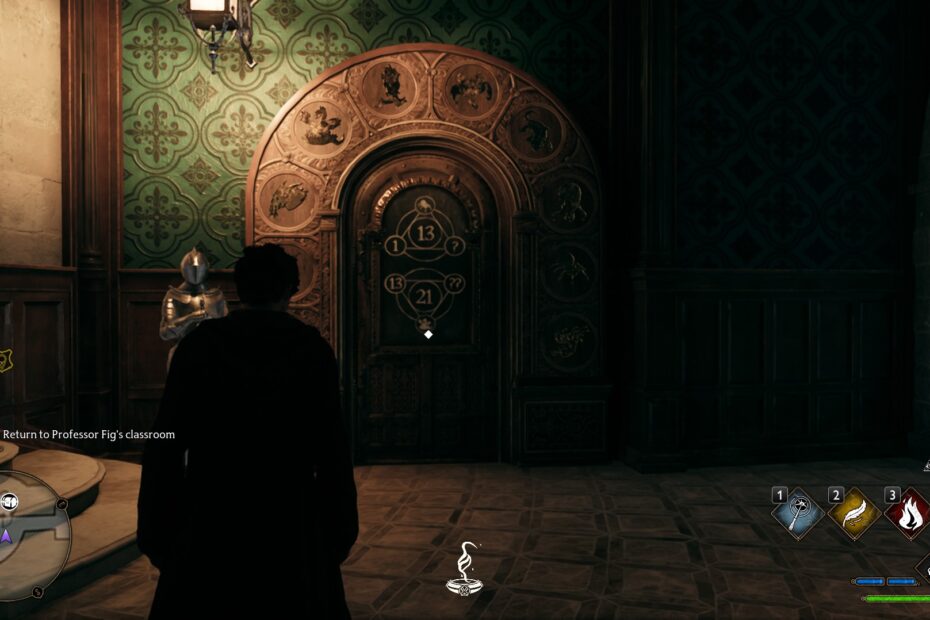
When players first approach a symbol door, they will notice animal symbols surrounding the door and two triangles appearing in the center with numbers. There are also two dials that can be rotated next to the door, each one corresponding to one of the triangles.
The animal symbols around the door each represent a number from 0 to 9 in the following order:
- Furry Creature – 0
- Unicorn – 1
- Strange Goat – 2
- Three-Headed Snake – 3
- Weird Owl – 4
- Sad Spider – 5
- Lizard – 6
- One-Eyed Squid – 7
- Spider – 8
- Hydra – 9
To solve the puzzles, players must:
- Add up the two numbers shown on the vertices of each triangle.
- Subtract those summed numbers from the number in the middle of each triangle.
- Rotate the dials to match the corresponding animal symbol for the resulting numbers.
Once the correct symbols are selected, the door will unlock, revealing magical rewards inside.
All 12 Symbol Door Locations and Solutions
Here are the locations, puzzle solutions, and rewards for all 12 symbol door puzzles found throughout Hogwarts Legacy:
1. Charms Classroom
Location: Inside the Astronomy Wing, to the left from the Charms Classroom entrance. Requires Alohomora to access initial door.
Solution:
- Triangle 1: 5 – (3 + 0) = 2 (Strange Goat)
- Triangle 2: 12 – (1 + 4) = 7 (One-Eyed Squid)
Rewards: Jobberknoll Statue, Stylish Blazer School Uniform
2. North Hall
Location: Inside the door off the North Hall corridor in the Astronomy Wing. Climb the nearby staircase and navigate the cobwebs.
Solution:
- Triangle 1: 10 – (2 + 2) = 6 (Lizard)
- Triangle 2: 13 – (7 + 1) = 5 (Three-Headed Snake)
Rewards: Ruined Stairway, Forest Tartan Scarf
3. The Great Hall
Location: In the Great Hall, to the left of the entrance past the statues.
Solution:
- Triangle 1: 24 – (9 + 7) = 8 (Spider)
- Triangle 2: 14 – (0 + 11) = 3 (Three-Headed Snake)
Rewards: Tree Collectible, Gold Rimmed Half-Moon Spectacles
4. Central Hall
Location: In the Library Annex near the Central Hall floo flame, along the left wall near the giant statue.
Solution:
- Triangle 1: 21 – (11 + 2) = 8 (Spider)
- Triangle 2: 17 – (5 + 9) = 3 (Three-Headed Snake)
Rewards: Mannequins, Black Leather Gloves
5. Central Hall Rafters
Location: Accessible after unlocking the symbol door in Central Hall. Take stairs behind the Divination Classroom floo flame.
Solution:
- Triangle 1: 9 – (2 + 3) = 4 (Weird Owl)
- Triangle 2: 4 – (1 + 3) = 0 (Furry Creature)
Rewards: House Wall Banners
6. Arithmancy Classroom Door 1
Location: After unlocking Central Hall Rafters door, enter Arithmancy Classroom and located the symbol door on the left wall.
Solution:
- Triangle 1: 15 – (6 + 5) = 4 (Weird Owl)
- Triangle 2: 18 – (13 + 0) = 5 (Sad Spider)
Rewards: Giant Purple Toad Statue, Embroidered Formal Uniform
7. Arithmancy Classroom Door 2
Location: Located on the right wall after entering the Arithmancy Classroom. Available after unlocking the other door.
Solution:
- Triangle 1: 17 – (6 + 5) = 6 (Lizard)
- Triangle 2: 8 – (0 + 7) = 1 (Unicorn)
Rewards: Gardener’s Robes, Sleek Duelling Gloves
8. Long Gallery
Location: In the Library Annex wing, pass the green lit door in the Potions Classroom and use Alohomora to enter. Symbol door is at the end around the corner to the left.
Solution:
- Triangle 1: 22 – (12 + 8) = 2 (Strange Goat)
- Triangle 2: 9 – (1 + 7) = 1 (Unicorn)
Rewards: Painting (Revelio for Field Guide), Unidentified Collectible, Forest Rivet Gloves
9. Faculty Tower
Location: Tower opens after completing Professor Moon’s quest. Behind the guard on 1st floor (use Disillusionment).
Solution:
- Triangle 1: 13 – (8 + 5) = 0 (Furry Creature)
- Triangle 2: 14 – (3 + 2) = 9 (Hydra)
Rewards: Shelf Collectible, Elegant House Cloak
10. Grand Staircase
Location: In the Grand Staircase wing, located off the path leading down towards Hufflepuff Basement. Use stairs or Levioso to access dial.
Solution:
- Triangle 1: 23 – (15 + 2) = 6 (Lizard)
- Triangle 2: 19 – (3 + 9) = 7 (One-Eyed Squid)
Rewards: Dwellings, Teal Pelmette Scarf
11. House Hourglasses
Location: In Grand Staircase wing, up stairs across from the floo flame near House point hourglasses.
Solution:
- Triangle 1: 6 – (2 + 4) = 0 (Furry Creature)
- Triangle 2: 11 – (1 + 5) = 5 (Sad Spider)
Rewards: Large Decorated Tables, Indigo Sorcerer Hat
12. Ravenclaw Tower
Location: Inside Ravenclaw Tower corridor, symbol door located straight ahead coming off stairs.
Solution:
- Triangle 1: 13 – (1 + 8) = 4 (Weird Owl)
- Triangle 2: 21 – (13 + 3) = 5 (Sad Spider)
Rewards: One or Two Rules Play Cards, Competitive School Robe
And that covers all 12 symbol door locations, solutions, and rewards found in Hogwarts Legacy!
Tips and Strategies for Solving Symbol Puzzles
When tackling symbol doors, keep these tips in mind:
- Search the entire castle to find all doors – they are often hidden behind obstacles or down side passages requiring Alohomora.
- Thoroughly explore all available locations since some doors only appear after completing certain events or quests.
- Pay close attention to the animal symbols and numbers shown and solve the math equations step-by-step.
- If struggling, take a break or reference the locations/solutions listed to check your work.
- Approach every triangle as its own separate equation to solve when calculating.
- Standing at different angles can sometimes make deciphering the etched shapes on dials challenging.
- Having the Disillusionment charm unlocked helps safely bypass certain guards or obstacles blocking access to doors.
- Doors respawn collectibles and outfits inside after a certain period of time if you want duplicates.
Solving all 12 symbol doors requires patience, an eye for patterns, math competence, and investigative exploration. But the magical rewards make overcoming these cryptic puzzles deeply satisfying. So delve into the secrets behind Hogwarts’ symbol doors and let the adventure unfold!