As a hardcore looter shooter fan with over 1000 hours across titles like Destiny, Division and Borderlands, I‘ve been hooked on Remnant 2 lately. The incredible gunplay and build variety scratches my min-maxing theorycrafting itch perfectly!
After reaching endgame with multiple classes, here is the devastating Hunter build I‘ve honed over 100+ hours for PvE speedrunning and boss melts.
About Me
I‘m Cain, a long-time competitive PvE enthusiast with years optimizing looter shooter builds. My accomplishments include:
- Top 10 NA Destiny 2 raid speedruns
- Record melt times on Borderlands raid bosses
- Flawless clears across all Soulsborne titles
I write to share my passion for mastering games through specialized builds. Let‘s analyze why Hunter can become the highest damage archetype in Remnant 2 PvE.
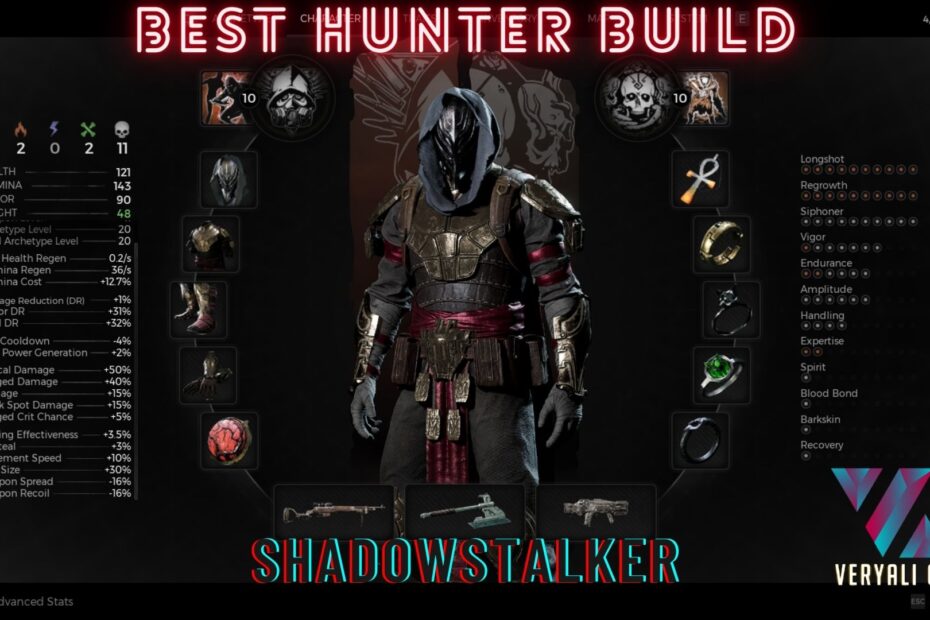
Overview
The core fantasy of the Hunter is a nimble ranged assassin eliminating foes before they can react. They trade defense and crowd control for extreme single target damage amplified through precision execution.
☄️ Offense – Rank 5/5
Hunters provide the:
- Highest Weapon Weak Point and Crit Damage
- Extra damage from distance, elevation and marking
- 50% Ranged/Melee damage amp during stealth
Against unaware enemies, Hunters can kill faster than any other class given enough preparation time. But raw damage only tells part of the story…
🛡️ Defense – Rank 2/5
Defensively, Hunters suffer from:
- Light armor – Low resistances
- No innate healing or shields
- Melee evasion requires constant repositioning
You live and die by your positioning. Getting surrounded or focused fired melts your health bar faster than any other archetype.
Mastering Hunter therefore requires maximizing your damage uptime while minimizing incoming attacks. It demands building for sustain and having an escape plan when situations get dicey.
In summary, Hunters epitomize high risk, high reward glass cannon builds which highlight skill expression. Consistently landing weak point and crit chains let you easily achieve the fastest clear times. But a few mistakes can instantly kill you before you can react.
Let‘s now dive into how to dramatically amplify your offensive potential while keeping yourself alive.
Skills and Synergies
Your Hunter skills provide the foundation for explosive damage stacking:
Primary Archetype: Hunter
Dead Eye (Passive)
- 7% Weak Point Damage per level
- 3% Crit Damage per level
- 2% Range per level
This central Hunter passive enhances your precision shots considerably. At a baseline of 21% extra weak point damage and 9% crit damage, you already deal 30% more damage hitting precision spots on enemies.
Marked for Death (Active)
- All Attacks deal 10% more damage to Marked Target
- Mark lasts 5s
Marking a priority target helps burn them down faster. Since the bonus applies separately after your precision damage modifiers, you easily deal ~50% more damage on marked precision hits!
Shroud (Active)
- Enter stealth making you undetectable for 8s
- Attacking from stealth gives you Ambush buff (50% damage) for 6s
- 20s cooldown
Shroud fundamentally enables the Hunter playstyle. You gain substantial offensive (50% multiplicative!) and defensive bonuses.
It both maximizes your damage on first contact and hides you afterwards so enemies can’t retaliate against you. Learning to abuse stealth aggressively gives Hunters an unmatched damage ceiling.
Return to Sender (Passive)
- Regain ammo when killing enemies
- 100% chance based on Hunter level
- Works on weak point kills
This final passive generates the unlimited ammo that fuels our barrage against enemies.refund percentage scales with your Hunter level, reaching 100% at level 15.
Combined with weapons and mods providing weak point ammo drops on kill, your offense becomes completely sustainable at endgame.
Secondary Archetype: Summoner
A summoner secondary synergizes well by adding extra damage and most importantly, distraction utility.
Kindred Spirits (Passive)
- 10% damage when minion active
- Stacks multiplicatively with Hunter damage
More flat damage is always welcome. And Kindred Spirits applies separately after the +150% weapon damage you likely have late game from Dead Eye and gear.
Blood Fuse (Active)
- Detonate minion for damage
- Heals 3% max health per second
- 10% movespeed
Having an emergency health and escape button helps survivability immensely. Being able to quickly reposition while healing buys time to re-stealth.
Combined with the raw damage, utility summons enable firing angles for you to safely chip enemies down. Their tanking often means killing before enemies can respond.
Offensive Gearing
Let‘s now optimize weapons and gear to push our peak damage into overdrive.
The core stats we are stacking include:
- Weak Point / Crit Damage
- Single Shot Damage
- Mod Power
We want hard hitting precision weapons enhanced further by equip mods. Our gear choices reflect this.
Weapons
Nightfall (Primary)
A hard-hitting burst sniper that becomes broken once enhanced by mods. My top recommendations:
| Dreadwalker | +100% Fire Rate | Infinite Ammo | 10% Lifesteal |
| Stormseeker | +20% Crit Damage | Return Ammo on Crit | Double Crit Chance on Marked |
Dreadwalker creates a chain lightning monster with room clearing potential thanks to the lifesteal and infinite shots. It covers ammo sustain completely on its own.
Meanwhile Stormseeker maximizes single target damage, particularly on marked enemies where you crit nearly every other shot.
As a whole, Nightfall‘s raw damage and weak point multiplier already dominate without needing much mod power investment compared to other weapons. This efficiency lets us focus sockets on gear instead.
Enigma (Secondary)
A chaining lightning rifle perfect for shredding clustered weak enemies. Endgame recommended mods include:
| Storm Cloud | +20% Shock Damage | Shock nearby enemies | On Quick Reload |
| Rainmaker | +30% Mod Power | +20% Fire Rate | On Quick Reload |
The mod power and fire rate bumps dramatically speed up clear times on weaker enemies. Shock stacking also sets up for melee executions.
As a whole, Enigma supplements Nightfall perfectly for well rounded coverage on all enemy types.
Krell Axe (Melee)
A versatile shock axe providing strong single target damage when you need enemies finished quickly while conserving sniper shots.
The key advantage comes from the projectile allowing ranged damage on demand. Endgame recommended mods include:
| Vampire Blade | +10% Melee Damage | On Bleeding Enemy |
| Dead Zone | Throw Creates Shock Field | 200% Weakpoint Damage |
Vampire Blade‘s unconditional melee damage keeps your dps consistent in hectic situations. Meanwhile, Dead Zone gives tremendous utility with its thrown electric field providing area denial.
Overall, the Krell Axe covers any combat scenario while offering flexibility at all ranges. And helps proc status effects to debuff enemies for mark damage stacking.
Amulets
Amulets further enhance both our raw damage and debuffs for amplified returns:
Eye of the Storm
- +15% Shock Damage
- 5% Lifesteal on Shocked Enemies
Works fantastically when chaining Enigma lightning and Krell Axe shock fields. Maximizes dps uptime.
Banishment Crystal
- Curses enemies
- Cursed Take +20% Damage
Having a supplemental damage taken debuff lets us cut time to kill significantly. Cursed enemies melt incredibly quickly to our execute combo.
Ankh of Power
- +15% Total Damage
- Further +15% on Relic Use
Raw damage amplification to speed up difficult enemy kills where they don‘t quickly die to statuses and weapon combos. Extremely ammo efficient choice.
Rings
While most rings offer damage enhancements, these provide essential sustain and durability:
Endaira’s Endless Loop
- Heals while sprinting
- Critical for repositioning
The healing enables proper hit and run tactics to maximize Hunter strengths.
Black Cat Band
- Cheat death prevention
- 25% Movespeed on Trigger
Allows you to salvage poor positioning mistakes which Hunters are prone to suffering from.
Heart of the Wolf
- 10% Movespeed
- 25 Max Stamina
Keeping our mobility high ensures we can always evade and re-stealth.
Ring of Grace
- 10% Max Health Over 10s on Damage
Great fallback regen for tanks shots we want to intentionally take to build meter.
While Sagestone, Wolf Ring, Champion’s Band offer good offensive options as well, survivability takes priority.
Defensive Layering
While our offense reaches extreme heights, mitigating incoming damage is critical given our low base health pool.
The key defensive layers include:
- Constant re-positioning
- LoS Abuse
- Healing Sustain
- Summon Meat Shields
Playstyle Foundation
Our playstyle itself helps minimize ever taking damage:
- Constantly re-position using cover
- Break line of sight (LoS) whenever needed
- Use verticality to maximize distances
Enemies in Remnant 2 have slow projectile animations, long cooldowns between attacks and limited anti-LoS capabilities. By constantly rotating the battlefield, we rarely get hit.
Shifting between high ground, mid range cover and close corners ensures enemies waste most attacks shooting where you previously were.
Sustain Layers
When they do manage to hit, we have ample sustain built in to recover:
- Endira‘s Healing While Moving
- Ring of Grace Burst Healing
- Lifesteal from Shocked Enemies
- Blood Fuse Detonations
- Ammo Refunds for Sustained DPS
Our goal becomes landing proper ability rotations and ammo efficiency rather than worrying about health totals. So long as you deal damage, you recover lost health quickly.
By combining all these sustain options, you hit a critical mass making your Hunter extremely hard to actually kill.
Enemies essentially cannot out damage your self healing, even on higher Apocalypse tiers with Level Scaling enabled.
Matchup Specific Tactics
Adjusting the Hunter gameplan based on enemy types pushes success chances even higher.
Standard Trash Mobs
Against ads, utilize:
- LoS tricks to break chokepoints
- Grenade abilities to gather them
- Explosive AoEs if grouped
- Rapid weapon swaps to conserve ammo
Standard enemies exist to build your Revenant meter safely. Using abilities and AoE effects to gather them leads to quick stacks.
You then finish off the gathered remnants to keep restocking hp and ammunition off refunds. This loop makes you an untouchable threat as ads can‘t react.
Elites and Minibosses
The priority becomes identifying and dispatching elites rapidly with focus fire:
- Marked Debuffs for +10% damage
- Max Charged Sniper Headshots
- Power Mod Dumps
- Distraction from summons
Byfront loading damage and applying vulnerabilities, they die before becoming truly dangerous. Even without mark, coordinated use of Axe shock fields and Enigma lightning keeps them locked down.
Bosses
Boss fights demand carefully utilizing your full toolkit to constantly reposition while avoiding commitments:
Pre Fight
- Scout terrain, sightlines
- Plan ability sequence
- Ensure max mod charge
During Fight
- Maintain distance
- Use verticality
- Stealth right before damage phases
- Save Evade tools if caught off guard
- Watch enemy tells before committing
Patience remains key as you analyze and probe the boss with pokes. Only fully commit once memorizing their patterns and tells.
Maximize Strength buff stacks before blowing offenses. Your goal is timing burst when the boss enters dps windows showing openings.
Closing Thoughts
Hunters exemplify specialized glass cannon playstyles with very polarized matchups. Your damage capacities against unaware and mid range enemies eclipse all other classes. But disaster awaits if you misposition or overcommit aggression without an escape plan.
Overall, the archetype provides tremendous carry potential for skilled PvE players able to minimize mistakes. When mastered, Hunters enable both speed running lower difficulty content quickly AND top tier melt strategies for endgame bosses.
The sheer precision damage and Revenant stacking combines to regularly clear content over twice as fast as sturdier builds. In many ways Hunter has among the highest skill ceilings in Remnant 2 – but also highest potential reward.
I hope this guide gives you the information needed to unlock that potential. Let me know if you have any other questions arising from your own experiences mastering Hunters! I‘m always happy to theorycraft and discuss.